If You have Ordered a DIY kit, watch the video below for building instructions
Your device has already been flashed
Plug In your Reader, and connect to the WiFi network provided by the
Tagreader e.g: tagreader
You should get presented with a similar screen as the one below
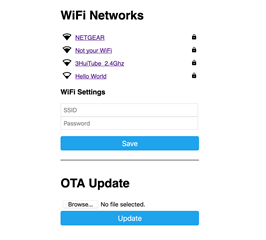
In this web interface, you can manually enter the WiFi settings of the device (please note this will be overwritten by any subsequent upload).
When you connect to the network, the web interface should open automatically. If that does not work, you can also navigate to http://192.168.4.1/ manually in your browser.
The reader won’t be able to connect to hidden networks as is
Your tagreader should restart if that’s not the case please unplug the power supply and replug it.
In Home Assistant you should get a notification that a new device is available. Add it, scan your first tag and have fun.
We hope you will have as much fun using your device as we had designing it.
In case of any question, do no hesitate to contact me via one of the following channels:
- Twitter : https://twitter.com/andreadonno (@andreadonno)
- Email : [email protected]
- Discord server: https://discord.gg/U2RBE4d
- By opening an issue on the github repo https://github.com/adonno/tagreader
Assembly Video